


TOPIC 2: LABORATORY TECHNIQUES AND SAFETY
A laboratory is a room or building specially designed for conducting various scientific experiments. An appropriate school laboratory has the following features:
- a room with enough space for carrying out scientific experiments;
- a store for keeping laboratory apparatus, chemicals and reagents;
- an office for laboratory technician to sit in and design scientific experiments;
- enough ventilation to let in fresh air and light;
- wide doors and several exits for emergency evacuation in case of an accident; and
- a wide table in front of the laboratory room, fitted with sinks for experiment demonstrations by the teacher or technician.
Rules and safety precautions in a chemistry laboratory
laboratory Rules
State laboratory rules
Chemistry is best studied through doing experiments. Most experiments are conducted in the laboratory. It is important to read and follow laboratory rules to avoid causing accidents. Your teacher will teach and give you more rules. The following are some important laboratory rules:
- Do not enter the laboratory without permission from your teacher or laboratory technician.
- Wear safety goggles all the time while in the laboratory. Obey this rule whether you are actually working on an experiment or simply writing in your laboratory notebook.
- Contact lenses are not allowed. Even when worn under safety goggles, various fumes may accumulate under the lens and cause serious injuries or blindness.
- Put on closed shoes and trousers when in the laboratory. Sandals and shots are strictly prohibited.
- Never walk or run unnecessarily in the laboratory.
- Tie back long hair when using open flames.
- Eating, drinking, and smoking are strictly prohibited in the laboratory.
- Don’t perform any experiment not authorized by your teacher or lab technician. If you are curious about trying a procedure not covered in the experimental procedure, consult your teacher or laboratory technician.
- Never taste anything. Never directly smell the source of any vapour or gas; instead drift a small sample to your nose. Do not inhale this vapour directly but take in only enough to detect an odour if one exists.
- Always wash your hands after experiments.
- Never use your hands to transfer chemicals. Use a spatula instead.
- Notify your teacher or technician immediately in case of an accident
- Know what chemicals you are using, carefully read the label twice before taking anything from the reagent bottle. Do not interchange labels.
- Excess reagents are never to be returned to stock bottles. If you take too much, dispose of the excess.
- Many common reagents, for example, alcohol, acetone and carbon disulphide are highly flammable. Do not use them anywhere near open flames.
- Pour more concentrated solutions into less concentrated solutions to avoid violent reactions. For example, always add acid to water; not water to acid. If you pour water into acid instead, the heat of reaction will cause the water to explode into steam, sometimes violently, and the acid will splash.
- If chemicals accidentally splash onto your skin or eyes, flush immediately with plentiful amounts of water and report to your teacher or lab technician.
- Never point a test tube or vessel that you are heating at yourself or your colleague.
- Dispose of chemicals properly. Unless you are told otherwise, assume that only water may be poured in the laboratory sinks.
- When an experiment is completed, always clean up your work area and dispose of the broken glass properly. Return all equipment to its proper storage places.
- Never take away anything from the laboratory without your teacher’s permission.
- Beware of hot glass because it looks exactly the same as a cold glass. Never touch it with your hand.
- Always adjust the Bunsen burner to give a luminous flame when not using it (or just simply turn it off).
- Use equipment or apparatus only for its designated use.
- Never eat or drink from laboratory glassware.
- Make sure all the burners are turned off before leaving the laboratory. Check that the gas tap is off as well.
- Never heat a liquid in a closed container. The expanding gases produced may blow the container apart, injuring you or others.
- Use only those chemicals needed in the activity. Keep all lids closed when a chemical is not used.
- Do not use the same spatula to remove chemicals from two different containers. Each container should have a different spatula.
- Replace all stoppers, covers and caps as soon as you finish using it. Be careful not to exchange stoppers from two different containers.
- When heating glassware, use wire gauze or ceramic screen. This will protect glassware from the flame of a Bunsen burner.
- Never use broken or chipped glassware. If glassware breaks, inform your teacher and dispose of glassware in the litter bin.
- Keep all windows open for proper ventilation.
- When carrying out the experiment where you expect harmful gases to be produced, use the fume chamber. The fume chamber helps to disperse hazardous gases and vapours safely.
- Use a lighter or wooden splint to light burners. Do not use papers. Always strike the match before turning on the gas supply.
- In case of a gas leakage, turn off the gas tap and open the windows. Leave the room immediately.
- Do not touch any electrical equipment with wet hands. 36. Turn off any gas or water taps that are not in use.
The Safety Measures for a Chemistry Laboratory
Explain the safety measures for a chemistry laboratory
The chemistry laboratory can be a place of discovery and learning. However, by the very nature of laboratory work, it can be a place of danger if proper common-sense precautions are not taken. Effort has been made to eliminate the use of explosives, highly toxic and carcinogenic substances from the experiments which you will perform. However, there is a certain unavoidable hazard associated with the use of a variety of chemicals and glassware. You are expected to learn and adhere to all safety guidelines. This will ensure a safe laboratory environment for yourself and the people you may be working with or those near you. The following are important laboratory safety measures to obey:
- Label and lock all storage areas, cupboards, drawers, storage cabinets, refrigerators, etc. Locking will prevent accidental contact with chemicals or interference with equipment.
- Be familiar with the location, use and limitations of the safety devices. This includes fire extinguishers, fire blankets, fume hood, spill cleanup materials, first aid kit, eyewash stations and fire alarm.
- Keep all chemicals in properly labelled containers. This will prevent accidental use of the wrong chemical for a particular experiment.
- Be familiar with the appropriate safety measures to take when exposed to different hazardous materials. Information is available from your teacher or laboratory technician.
- All chemicals that react with each other must be stored separately.
- Be aware of the interaction of laboratory furniture and equipment with chemicals used or stored in the laboratory. For example, oxidizers should not be stored directly on wooden shelves.
- Use fume hoods/cupboards/chambers whenever possible.
- Never store food in a refrigerator or freezer where hazardous chemicals are stored. Also, do not eat anything you find in the laboratory or in the laboratory freezer or refrigerator.
- Make sure fire extinguishers are in good condition. Report any broken seals, damage, low gauge pressure or improper mounting to the teacher or laboratory technician. If the seal has been broken, assume that the fire extinguisher has been used and must be recharged. (Note: Do not use fire extinguishers unless you are trained and feel confident to do so).
- Stored chemicals must be inspected regularly to ensure they have not expired. Note the date when bottles were received and when were first opened. Note expiry dates on chemicals and their special storage conditions.
- Eliminate safety hazards by maintaining laboratory work areas in a good state of order.
- The laboratory must have wide emergency exits and wide windows. Wide exits facilitate easy evacuation in case of emergency. Wide windows allow enough air to enter and circulate in the laboratory. (Note: Maintain at least two clear passages to laboratory exits).
- Always keep tables, seats, fume hoods, floors and desks clear of unnecessary material.
- All equipment should be inspected before use. In addition, they should be checked regularly to ensure they are safe for use.
- If experiments must be left unattended, place a note next to experimental apparatus indicating the chemicals involved, your name and telephone number on which you can be reached in case of an emergency.
- Keep the laboratory floor clean and dry at all times. Clean spills of water or chemicals immediately. Then notify other laboratory workers of potential slipping hazards.
- The laboratory must be equipped with potable fire extinguishers and other safety devices with clear instructions on how to use them in case of any emergency.
- Containers for holding or storing chemicals must be inspected for leakages or other damages. They should have tight stoppers or covers.
- All experimenters and other persons working in the laboratory should wear protective gears to minimize exposure to hazards. These gears may include lab coats, hand gloves, gumboots, safety goggles, aprons, etc.
- There should be a manual or instruction guides on how to treat spills of different chemical substances.
- The fume chamber should be labelled. It should be kept in good condition to minimize unexpected gas leakages or emissions.
- Gas cylinders should be labelled, stored properly, and supported. Moreover, they should be in good working conditions all the time.
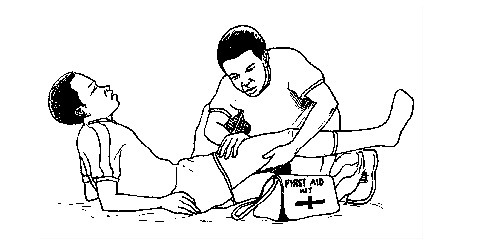
- Each laboratory should be equipped with adequate first aid kits.
- Equipment for monitoring contamination should be installed to give alerts of any possible dangers.
NOTE: All the above rules and safety measures are applicable to all research, teaching and academic laboratories. However, your laboratory may require some more rules that apply to specific materials and equipment.
First aid and first aid kit


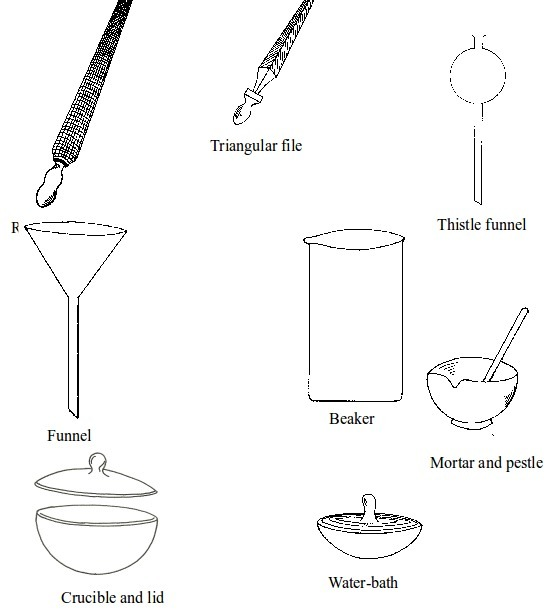
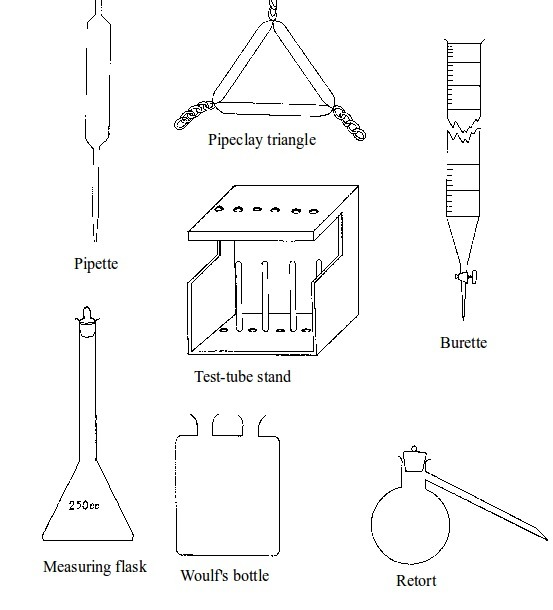
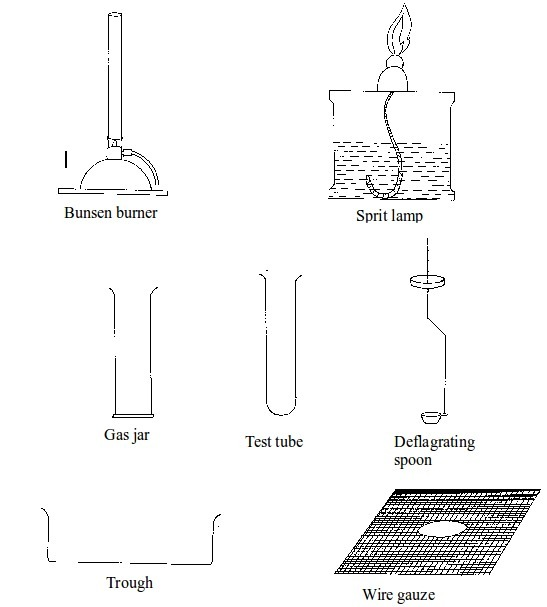
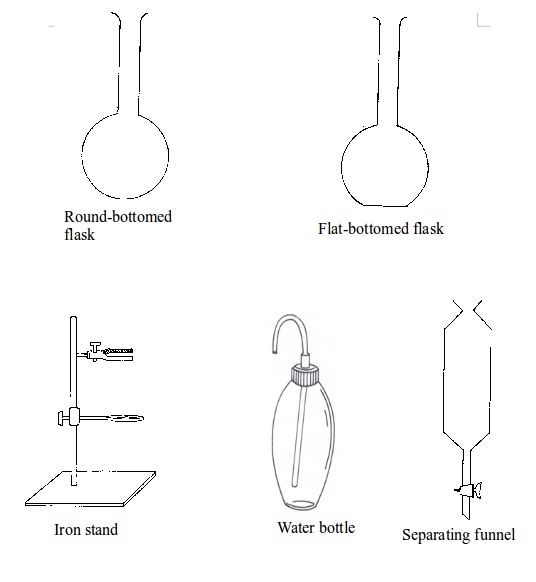
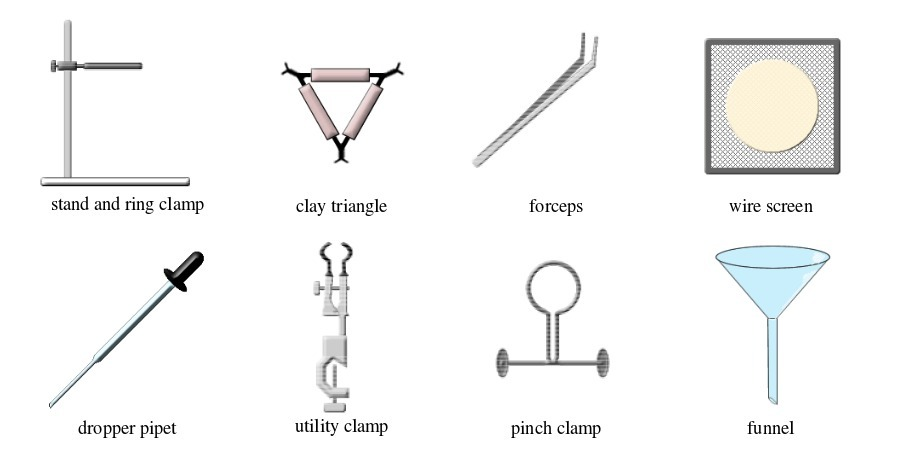
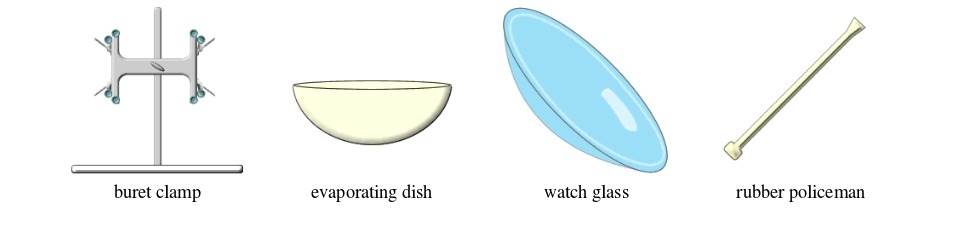
Basic chemistry laboratory apparatus and their uses


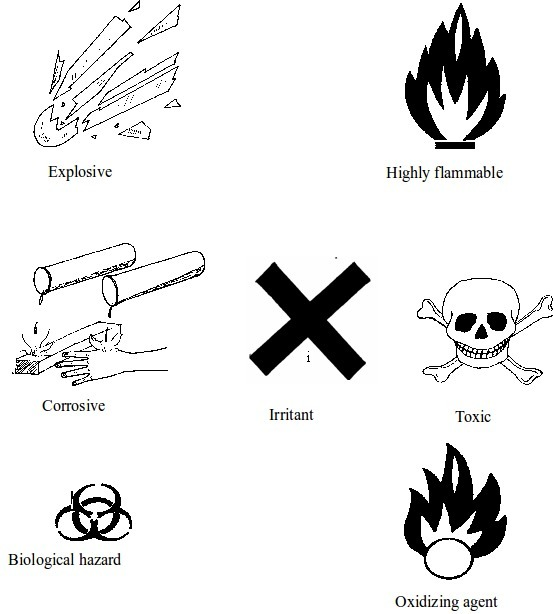
Warning signs